A few weeks back, I shot interior photography for Bignote Productions on the Gold Coast. The recording studio environment provides a number of challenges such as limited time and positions to shoot from, and while I was assessing the main issue of white balance, it occurred to me that the best way around this issue would be a helpful blog topic for amateur photographers. So here we are!
In the days of film (not so long ago), a photographer would decide which of the lights is the most dominant in the room and use that as a starting point. If it was tungsten light for instance (a regular light bulb), any additional light needed from the flashes would need to be balanced in colour, so the cooler flash light didn’t appear as blue. This was achieved by covering the flashes with a special orange gel (made from a type of cellophane), to warm the light and match the ambient tungsten light in the room. If there was a range of different lights with different colour temperatures, this became a very time-consuming task.
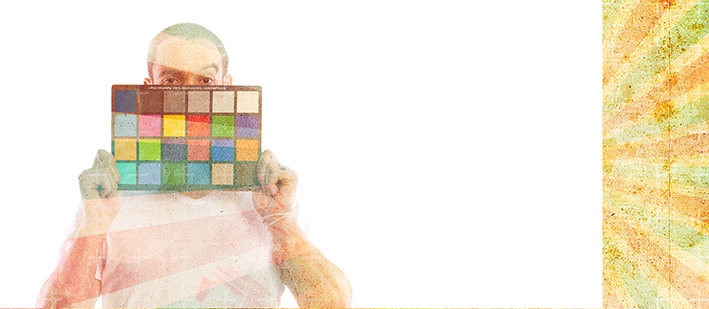
Fortunately with digital, there is a great cheat that makes life a lot easier. You just need to buy a cardboard colourchecker card from most pro photo stores. HERE is one that’s very similar to what I use. For a bit of cardboard, these are definitely a rip-off, yet somehow worth every cent! Shooting with a colour card in the scene first, allows you to be sure that your white balance is accurate. Rooms like this studio with so many different types of ambient lights, would otherwise be very problematic. Just follow these simple steps to nail your white balance every time:
- Step 1: Prepare the room, then when it’s ready to shoot, take a shot with the colour card placed in the scene close to your main focal point.
- Step 2: Remove the colour card and shoot the scene again, changing nothing.
- Step 3 (post-production): Take your dropper tool to sample your levels and set the white balance in your chosen processing software (eg: Adobe Bridge). You should be sampling from a mid-grey square on the card – usually 18% grey works well. The row of varying greys on the card is to allow you options in how warm/cool you’d like the shot to look.
- Step 4: When you clicked on your grey colour card square with your dropper tool, you will have noticed the white balance values change. Simply apply the same white balance settings to your final shot, which doesn’t contain the colour card in the scene.
- Step 5: You’re good to go!
There are so many uses for the colour card – this is just one. I also use mine religiously when shooting portraits in mixed light that I can’t control, so I can be confident that the skin tones are accurate. Hopefully this photography tip has been helpful to someone out there and will save you from ‘chimping it’ in your workflow by guessing colour temperature and hue levels. Happy shooting!